Showing posts with label photo reference. Show all posts

Monday, May 26, 2014

Summerbelle Crate Sketch


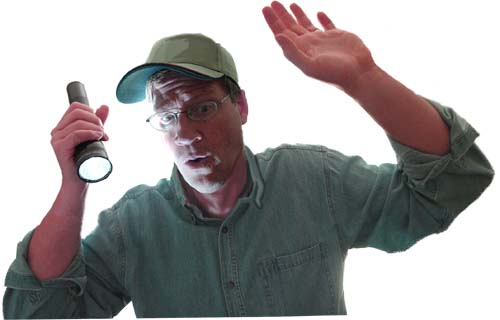
I'm working on a new project with John Ball at BDG. This one will be for a fruit crate. It's always fun to work with John. This one went pretty smoothly. I rented a costume and took pictures of a few options. I created once version with a hat and one with the umbrella, which we eventually went with.


I think either would have worked, which is a testament to how well the photo shoot went. It also goes to show how much easier things progress when you have great reference material.


In the past, I have shortchanged the reference gathering process and almost without fail, there is some aspect of the final rendering that does not go as well as planned. Some of these obstacles can be overcome easily by drawing upon years of experience or other creative means. Other times I am forced to go back to the drawing board and either find better reference or shoot new reference to solve the problem. This one is going well so far. I will post the final art as soon as I finish.

Thursday, August 23, 2012

Near Dusk - Sold

Near Dusk - 9" x 12" oil by Greg Newbold
Just got word that my little sunset painting entitled "Near Dusk" has sold at Williams Fine Art. This painting is my interpretation of what was a fleeting moment captured on a cell phone one winter evening. It is nice to always have a camera on hand (even a phone camera) since you never know when you might be inspired. This painting hung in my kitchen for quite a while, so it is a bit sad to see it go. I hope the new owners love it.

Thursday, April 26, 2012

Inventing Color from Black and White Reference


I did this as a demo for my Illustration 1 students to explain how I make the jump to a full color palette when working from black and white reference. I think this is a valuable exercise for any artist as it forces you to think outside of the box instead of relying on whatever colors are in your photo reference. This challenge was probably as beneficial for me as it was for the students. First, I found a photo that I had taken  at the Getty Museum of a Roman sculpture.


I liked the way the light played across the various planes of the head and the structure of his head was appealing. I knew that working from black and white would force me to think about the basics of color so I set a couple of parameters for myself. One was that I would consciously create a temperature shift from light to shadow and that regardless of the colors I chose, meaning that if the light source I defined was cool, I would paint the shadows warm and vice versa.  I would also maintain a strong value pattern from light to dark. Given these guidelines, I also wanted consciously chose colors that I do not normally work with, forcing myself to invent palettes out of my comfort zone.


The results were delightful and surprising. I found myself fully enjoying the experimentation and being excited by the way certain colors looked against others. Although in some respects the color palettes are not natural, I think they are all believable for the reasons I set as parameters from the beginning: the value patterns were maintained and the color temperature shifts from light to shadow. Each of these versions also has its own unique mood as well. This is an oversimplification of the concept of temperature shifts and they can often times be more subtle than what I did here. Creating color studies like these can be valuable in defining what you want to achieve in a particular piece. These head studies are 4" x 5.5" and I took about an hour and a half to paint each one.

Wednesday, March 14, 2012

Sticking To The Thumbnail Sketch

Thumbnail sketch
One of the things that frustrates my students and consequently me as a teacher is how often a successful thumbnail drawing is abandoned in the sketching process. I will often look at a good thumbnail and then, when I see revised drawings, wonder what happened to the flow, design, rhythm, etc. that I remember from the first sketch  Granted, some changes may be intentional and for the better, but if you lose the essence of the thumbnail- that thing that attracted you to the design and got you excited in the first place- then you are essentially starting over.


I always thumbnail out my idea first, before taking any photos. This allows me to solidify in my mind things like angles,  pose, lighting and basic composition. I then use my sketch to dictate how the photo shoot goes.


I match my models as closely as I can to the thumbnail idea. Sometimes the photo shoot suggests other options, and it's a good idea to take those photos as well, but I rarely go into a photo shoot without solid sketches.


If that happens, then I am letting the camera dictate the design of my piece and not my imagination. I think my imagination is usually superior to the mindlessness of a camera, so I try to not let the camera decide things for me.


I also take lots of detail shots as sometimes the angles and poses in my thumbnail are not comfortable or realistic for my models to capture in real life. I use the detail shots to get the info I need. I then take my thumbnail, lay tracing paper over the top and make my final drawing using details from multiple photos. Failure to use tracing paper in this stage of the process is the downfall of many a good student thumbnail.


I enlarge my thumbnail and use it as the "bones" of my design. I add the details or the "muscles and skin" over the top on the tracing paper. I can still see the original design and thus I can follow it, preserving the space relationships, rhythm and compositions that I carefully created in the thumbnail sketch.

If I had abandoned my thumbnail during the creation of this piece, I would likely not have been as happy with the result as I am. As you can see from the photos, none of them match my drawing exactly. I had to rely on information from all the photos as well as my thumbnail to arrive at the final sketch. There were even modifications in the final painting stage that were made to reflect more accurately the vision I had in the thumbnail stage. Trust your thumbnail. It usually does not lie because, if done well, it contains the bare essence of what you hope to express.

There is a great book by Ron Schick about how Norman Rockwell used reference photos called Norman Rockwell: Behind the Camera. It shows how Rockwell's process very closely mirrors what I and countless other artists use to get the information for their paintings.

Friday, February 3, 2012

Suspense


The Illustration Friday theme for the week is "suspense". I did this piece for a magazine article a couple of months ago. In the article, the father feels prompted to check on his young sons sleeping in the back of the camper truck while traveling on an early morning camping excursion. He finds them passed out from carbon monoxide poisoning, but they are revived because he listened to the prompting. The moment I chose to depict is that moment of suspense when the father doesn't quite know what is going on as he looks in the back of the truck. The light from the flashlight served to illuminate the bottom of this full page article. I cropped off the fade to white.


Once again, it's nice to have a willing model in a pinch as I used myself for this project. My indulgent wife shot the photos which I pieced together to get my photo comp from which to draw. This piece was painted entirely in Photoshop after I scannned in my drawing.

Tuesday, June 7, 2011

Christmas Gifts Spread-Final Drawing

Final approved drawing 

Just got approval for the opening spread of my Boys' Life project. Now on to paint. For this photo shoot I actually rented costuming. This is something that I rarely do because of time and cost constraints, but I may have to reconsider. I think the costuming can make a big difference in the photo shoot, especially in situations like this where there are period details and a certain need for authenticity. I did not want to rent all the pieces of the costume, but the coats, hats and scarves needed to feel right. I'm glad I went to the expense and trouble of finding the right costumes, this just means I need to paint faster in order to stay on some sort of schedule.

Monday, April 25, 2011

Christmas Gifts Rough Sketch

concept sketch- Pencil/digital 5.5" x 3.5"

I'm starting on another project for Boys' Life Magazine. This one is a feature fiction story about a young man arriving for Christmas at the home of his Aunt and Uncle in the foothills of the Sierra Nevada Mountains. Rather than being greeted with open arms, he finds neither of them in the cabin and must search the surrounding homestead in a blinding snowstorm to rescue them both. This is for the December issue and I am enjoying the rather extended lead time that I have been given. This should be a fun one- hopefully my concept will be approved and I can proceed with this sketch. If so, the next  step will be gathering effective costume and props and then shooting photos for reference.

Friday, March 25, 2011

Toys As Reference Material

Grandpa's Tractor (cropped) Acrylic/mixed media

Gathering the right reference material for your artwork can be a challenge, especially if you don't have easy access to the real thing. There are only so many sources to look to in your search for the right information (Internet, libraries, museums) and sometimes those results are unsatisfactory. I try to look for alternate sources to obtain the pictures that I need for a given project and one of those is using toy versions of the object in question.


 Over the years I have purchased and photographed a number of scale model ships and cars (you have to assemble them first) as well as replica toys as small as Matchbox cars.


For the above project, I found a set of three John Deere tractors to use. I picked the one that I liked the best and then set it up at the angle and lighting condition I wanted for my painting. I always draw out my idea sketches first so the photography goes smoothly and fits into my design.


Using a macro setting, I zoomed in as closely as I could and took the photos I needed. I then made final drawings and painted from my "toy reference". I could never have accurately imagined the angle of the overturned tractor without using this process.

Thursday, January 20, 2011

Evolution Of A Picture- Part 3


Once I have my composition well in hand I carefully evaluate what additional reference material I may need to complete the painting. Usually this involves finding a model and appropriate costume. I am always on the lookout for the right model and scope out people at church, school, neighbors and friends to enlist in the cause. Most people when approached are willing to work with you and I always compensate them in some way. If I am in a bind, I know this guy that models for me quite a bit. He works for free and is always available right when I need him. The only problem is getting my spouse to shoot the photos. (Thanks Hon!) I usually take loads of photos and then filter from them the information that I need to flesh out my drawings. I pay particular attention to faces and hands as well as drapery and shadows. These seem to be the hardest areas to get right if you don't have good reference material, and look the worst if you try to "fake" them. I always shoot detail shots and sometimes finesse the drapery  with a tug here or there to get the folds and shadows right. You will never be sorry you took a little extra time and attention at the photo shoot stage. It can make the difference between an average work and a really good one. The drawing at bottom is the one I used for the final painting. Note that the basic value patterns are already established. Early in my career, I often neglected to do a full value study which sometimes hurt my work.  Since I did this painting, I have put more effort into making sure the value study is clear.Photoshop is a great tool for laying in values quickly and getting the pattern working. I simply scan my sketch and lay in grey tones in a multiply layer.

Evolution of a Picture part 1
Evolution of a Picture part 2
Evolution of a Picture part 3
Evolution of a Picture Part 4

Wednesday, January 19, 2011

Evolution Of A Picture- Part 2

Yesterday I posted page one of my process tutorial. Step two for me is to do research on my subject. At times I have to do this simultaneously with the thumbnails, especially if I am not convinced i know what my subject looks like enough to draw from my imagination. The rough sketch on the bottom is a combination of elements from the research photos and my imagination. Tomorrow I'll post how my photo shoot factors into making my final drawing. Click image to see it larger and read text.

Evolution of a Picture part 1
Evolution of a Picture part 2
Evolution of a Picture part 3
Evolution of a Picture Part 4

Monday, December 27, 2010

Grand Canyon Christmas

Canyon Romance- by Greg Newbold
Oil on board, 5.25" x 5.25"

I had the opportunity this past summer to vacation on the North Rim of Grand Canyon with my wife. We had a great time together hiking and painting (at least I painted) and I gathered tons of photo reference including a bunch of shots capturing sunset lighting in the canyon. Well I took a day last week and made a little picture as a Christmas present to my sweetie to commemorate our trip. It was a pleasant and total surprise for her that she loved. The painting is rather small, but I had a randomly sized, bonus Gold River Gallery frame laying around from a previous order, so I decided to fill it. I am pleased how it turned out and I think I will also use it as a study for a larger painting.

Thursday, September 23, 2010

Grasshopper Final Drawings


I had to put this project for Boys' Life aside while I worked on a couple of other things, but I am now ready to get painting. I posted the rough thumbnail of the first one earlier and the final drawing of the third spot piece also. The second piece shown here is the climactic shooting challenge where young Crazy Horse shoots a gold coin out of the air with his bow and arrow. Of course his older, rifle wielding challenger is thoroughly dismayed. It took me a few days to line up the right age and build of model for my photo reference but I really got some good shots. Obviously, liberties were taken with the skin tones and the hair (my model is a blond haired white kid), but I got all the information I need for anatomy and lighting. I am excited to get on to the painting phase now.

Monday, August 30, 2010

Donut Falls

Donut Falls-Big Cottonwood Canyon, Utah

I went camping with my family over the weekend and aside from the soggy Friday evening complete with bouts of torrential downpour, we had a great time. Saturday dawned clear and bright with crystal blue skies and the tents mostly dried out before we had to pack them.

The Donut Hole seen from above

We ventured up to a lovely little waterfall appropriately named Donut Falls. I have made the hike before but not since a rockfall several years ago changed the vista. Rumors of the demise of the actual "donut" proved to be greatly exaggerated and I was grateful to see that the most unique aspect of the falls had survived, the cave that the stream falls through on the way downhill.

Inside the cave offers this dramatic view

The slope to the right had tumbled in front of the falls, narrowing the cave entrance dramatically but if you watch your head, you can still make it inside with little difficulty. After pooling in the cave, the water percolates through the sand and gravel and continues it's rush down the canyon.

The stream above the falls offers this picturesque vista

We also ventured up above the falls, a place which I had previously not seen and enjoyed this view of the stream carving it's way through the mountainside. I didn't bring any drawing or painting supplies on the trip and didn't want to delay the family anyway, so photos will have to do for this visit. Sometime I may paint a little scene from the trip with this reference.

Monday, June 21, 2010

Fort Worth, TX Rodeo


The twisting starts right out of the chute.

About three seconds in, things start to get hairy.

The cowboy takes one on the head.

A rodeo clown draws the bull away from the fallen cowboy.

During an MFA trip to Forth Worth Texas, we had the chance to attend a rodeo and take pictures from close up. I was struck with how enormous and powerful the rodeo stock animals were. We could actually feel the pounding of the hooves and at one point, a bucking bull came so close that I had dirt sprayed on me from the flailing hooves. I was clicking away with my multiple exposure setting and didn't realize how close he was until he was almost on top of me (separated by the gates of course). That got the heart thumping a bit. Here's a sequence of photos leaving a cowboy tossed on his head (he eventually walked away under his own power, but he took a hard fall. It was challenging to get photos amid such quick action, but I got some interesting results.